Plugin Development Tutorial
Plugins allow you to add your own custom analysis and visualization technique to the Xi-cam platform. In the following sections, we introduce two platforms for plugin development. The EZ plugin requires no knowledge of Qt and is best used for simpler analyses - see EZ Plugin Development Tutorial. The advanced plugin requires knowledge of Qt but is more flexible its applications, so it is best used for more complicated analyses - see Advanced Plugin Development Tutorial. Both platforms require knowledge of Python.
EZ Plugin Development Tutorial
The EZ Plugin is a flexible plugin class for users that do not want to learn Qt. They are easy to write, but limited in scope compared to plugins which inherit from the base class.
EZ plugins inherit from the plugin base class from xicam.plugins.base.plugin. For ease of implementation, it
has the following pre-set attributes:
pyqtgraph.ImageView, for viewing 2D images or plotspyqtgraph.PlotWidget, for viewing 1D images or plotspyqtgraph.ParameterTree, for holding and editing parameterstoolbar, to connect buttons to user-written methods.
Plugin Basics
First, a few quick notes about your plugins.
- Xi-cam assumes that any module or package in the
./xicam/plugins/folder is a plugin. To ensure that Xi-cam registers your plugin, place your module in this folder - Each plugin must define a plugin class which inherits from
xicam.plugins.base.plugin - Each plugin will use the default widgets of the plugin class if not set - see Advanced Plugin Development Tutorial
Plugin Creation
Our first step is to create the plugin by using the EZplugin class. Xi-cam assumes that any module/package in the
xicam/plugins directory is a plugin, so place your file in this directory. To create the EZplugin, simply write:
from xicam.plugins.base import EZplugin

EZTest = EZplugin()
Now we have a plugin created using the EZplugin’s defaults. Thus it does not have any functionality aside from the
widgets it inherits from the base and EZplugin classes. To start, we’ll provide the plugin with a name:
from xicam.plugins.base import EZplugin

EZTest = EZplugin(name = "EZTest")
Tbe Filebrowser and openfiles Method
Each plugin that inherits from the base plugin class (including the EZplugin class) inherits, by default, a file
browser from the base plugin. Clicking once on any image or dataset brings up a small preview.
Double clicking on the image provides the plugin a path to the selected image. The EZplugin class comes with
methods that place data into the 1D or 2D data viewers. The user, however, must write the method, the openfiles
method, that takes the path provided by the filebrowser, opens the associated data set, and place the data into the
plugin itself.
from xicam.plugins.base import EZplugin

def opentest(filepaths):
    import fabio
    for filepath in filepaths:
        img = fabio.open(filepath).data
        EZTest.setImage(img)

EZTest = EZplugin(name = "EZTest", openfileshandler = opentest)
Here we have written a function opentest which takes a path to a set of data (or a list of paths), opens it, and
displays it using the setImage method. By adding the clause openfileshandler = opentest to the instantiation,
we set the openfiles method of the plugin to the opentest function.
The EZplugin also has a plot method, which plots 1D data instead of 2D data: see Data Analysis and the Toolbar for an example
of its use.
The openfiles method we have written uses the open function from fabio, a Python paackage. After the data
is opened, the function opens the data using the given path(s) and plots it on the proper viewer.
Parameter Table
Parameters are displayed on the right side of the plugin window in a table format. Parameters may be added to this table in the instantiation. When adding parameters, they must be formatted as dictionaries, and have multiple adjustable subfields, including the parameter name, type, start value, and default value. Consider the following addition:
from xicam.plugins.base import EZplugin

def opentest(filepaths):
    import fabio
    for filepath in filepaths:
        img = fabio.open(filepath).data
        EZTest.setImage(img)

EZTest = EZplugin(name = "EZTest", parameters = [{'name':'Test','value':10,'type':'int', 'default':10}], \
                openfileshandler = opentest)
The code above will add a single parameter to the parameters list in the plugin. The parameter is named “Test,” is an integer, and has starting and default values of 10. Adding other parameters follows the same format:
from xicam.plugins.base import EZplugin

def opentest(filepaths):
    import fabio
    for filepath in filepaths:
        img = fabio.open(filepath).data
        EZTest.setImage(img)

params = [{'name':'Test','value':10,'type':'int','default':10},
          {'name': 'Ducks', 'type': 'str', 'value': 'Mallard', 'default': 'Mallard'},
          {'name': 'Rabbits', 'type': 'str', 'value': 'Flemish Giant'}]
EZTest = EZplugin(name = "EZTest", parameters = params, openfileshandler = opentest)
Adding parameters is also possible with the EZplugin method addParameter, so long as the parameters follow a
similar format as the previous examples.
Note that the ‘value’ and ‘default’ fields are both optional, and do not have to match each other. The parameters are
held in a field of the EZplugin called self.parameters. You may access these parameters directly. For example,
self.parameters.child('Rabbits') contains all information about the “Rabbits” parameter. So
self.parameters.child('Rabbits').value() and self.parameters.child('Rabbits').type() return, respectively,
‘Flemish Giant’ and ‘str.’
Data Analysis and the Toolbar
You may perform data analysis by writing plugin methods and connecting these to the EZplugin’s toolbar. The work of
connecting the buttons is performed by the EZplugin’s instantiation method. To add a button, you must provide a
function to connect to the button, an icon for the button, and (optional) a name to associate with the button. Here is a
simple example:
from xicam.plugins.base import EZplugin

def opentest(filepaths):
    ...

def runtest():
    import numpy as np

    img = np.random.random((100,100,100))
    EZTest.setImage(img)

    hist = np.histogram(img,100)
    EZTest.plot(hist[1][:-1],hist[0])

params = [{'name':'Test','value':10,'type':'int','default':10},
          {'name': 'Ducks', 'type': 'str', 'value': 'Mallard', 'default': 'Mallard'},
          {'name': 'Rabbits', 'type': 'str', 'value': 'Flemish Giant'}]

EZTest = EZplugin(name = "EZTest", toolbuttons=[('xicam/gui/icons_34.png',runtest, 'Run test')], parameters = params, openfileshandler = opentest)
The two important additions are the function runtest, which creates an image and 1D histogram and plots them both
in the appropriate viewers. The addition toolbuttons=[('xicam/gui/icons_34.png',runtest, 'Run test')] to the
instantiation connects this function to a button represented by icons_34.png. Clicking the button will cause
runtest to run. The string 'Run test' is the name associated with the button. To add more buttons, you
must provide similar tuples with 1) an icon path, 2) a method, and 3) a name.
Adding buttons is also possible with the addToolButton method of EZplugin.
It is possible to use the parameters in self.parameters for your functions by accessing them directly: see the
last paragraph of Parameter Table.
Example
In this example we will show the functionality of the plugin we have built in the previous sections. The code in its entirety is shown below:
from xicam.plugins.base import EZplugin

def opentest(filepaths):
    import fabio
    for filepath in filepaths:
        img = fabio.open(filepath).data
        EZTest.setImage(img)

def runtest():
    import numpy as np

    img = np.random.random((100,100,100))
    EZTest.setImage(img)

    hist = np.histogram(img,100)
    EZTest.plot(hist[1][:-1],hist[0])

params = [{'name':'Test','value':10,'type':'int','default':10},
          {'name': 'Ducks', 'type': 'str', 'value': 'Mallard', 'default': 'Mallard'},
          {'name': 'Rabbits', 'type': 'str', 'value': 'Flemish Giant'}]

EZTest = EZplugin(name = "EZTest", toolbuttons=[('xicam/gui/icons_34.png',runtest, 'Run test')], parameters = params, openfileshandler = opentest)
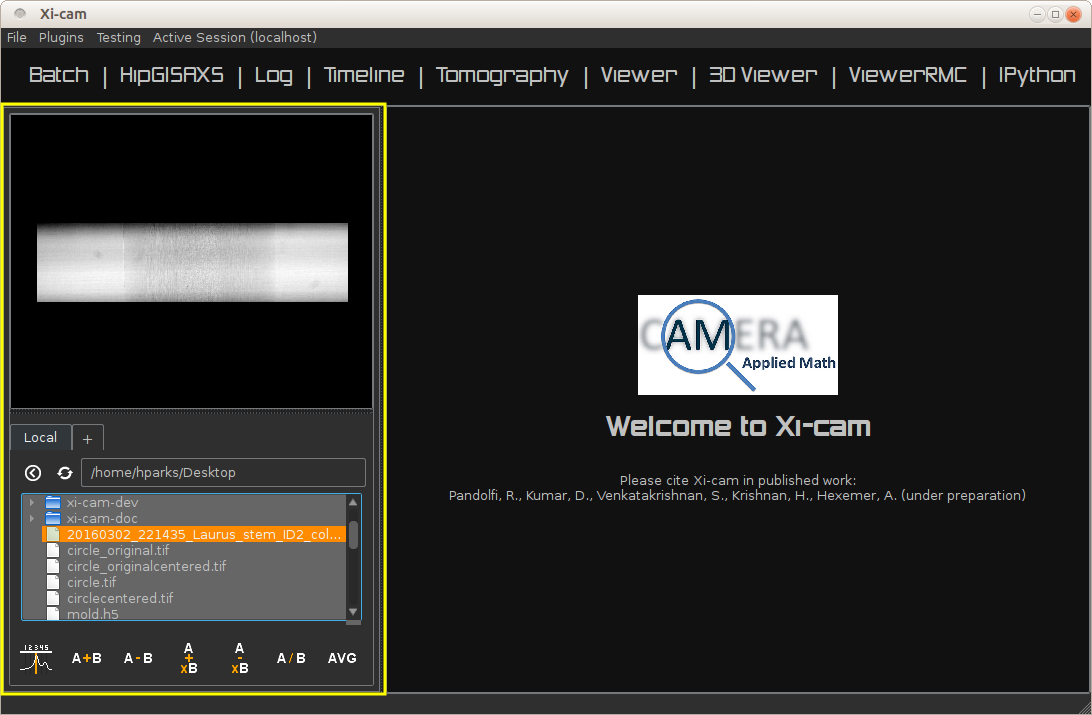
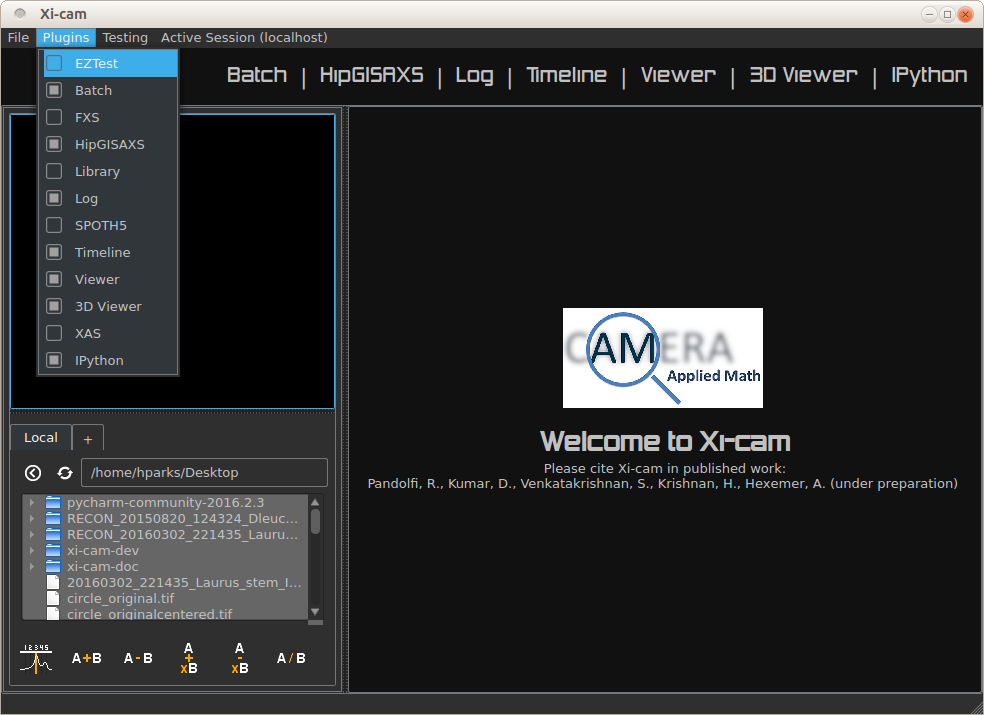
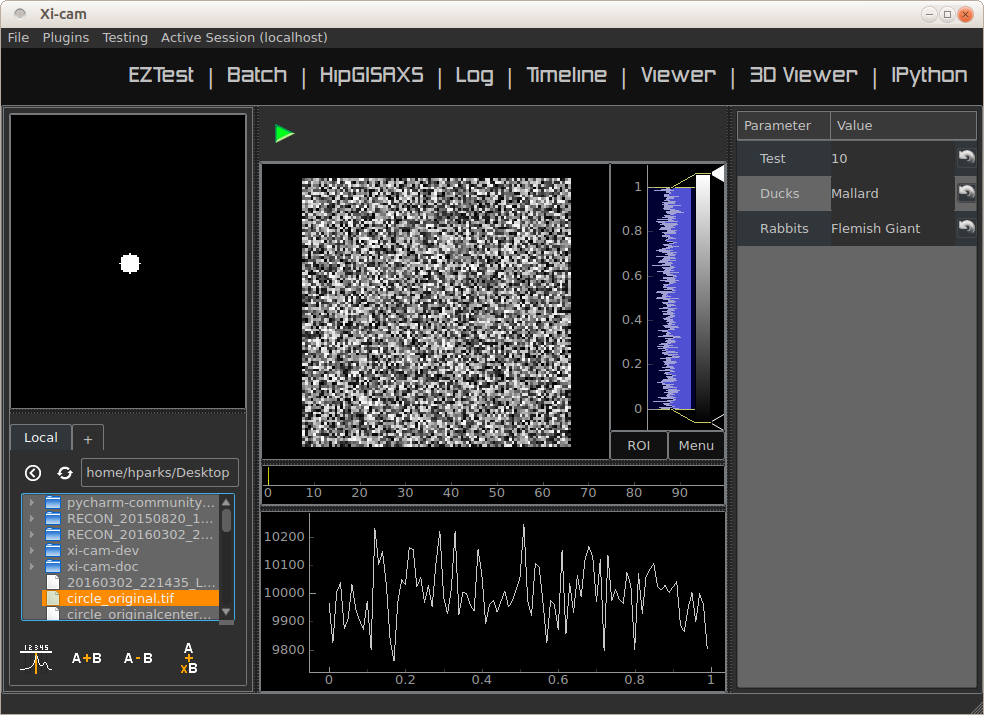
The opening screen of Xi-cam is shown in the image below.
The list of available plugins is shown at the bar at the top (“Batch”, “HipGISAXS”, “Log”, etc). To add the “EZTest” exaample, click the “plugins” bar at the top of the page and click the “EZTest” option.
Clicking on the “EZTest” tab will lead you to the interface. The parameters tab is on the right, and empty viewers in the center.

Double clicking an image in the filebrowser brings it up on the viewer, due to the opentest function we wrote.
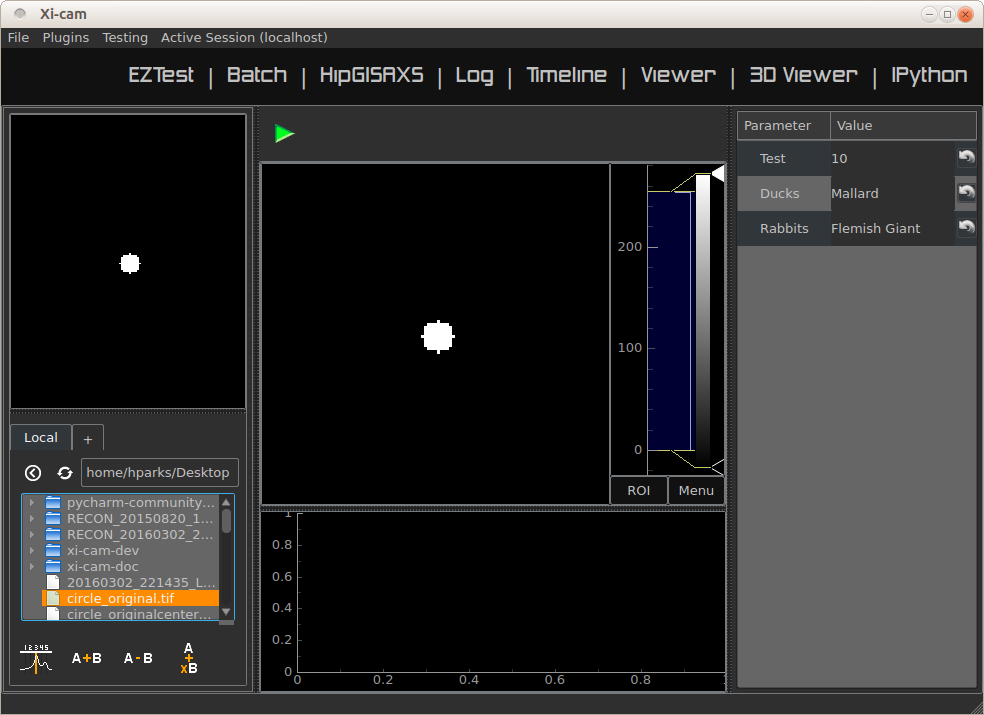
Finally, clicking the green arrow above the 2D viewer will cause the runtest function to run. The output is shown
in the image below.
Advanced Plugin Development Tutorial
Plugins allow you to add your own custom analysis and visualization technique in the Xi-cam platform. This requires some knowledge of Python and Qt. In this tutorial we demonstrate implementing a plugin for an external binary, HipRMC.
The HipRMC binary accepts a single argument: an input parameter file. HipRMC outputs by writing images to disk. This plugin mediates these exchanges and displays the results.
Recall that Xi-cam assumes that any module/package in the xicam/plugins directory is a `plugin`. All Xi-cam plugins must define a plugin class which inherits xicam.plugins.base.plugin and has attributes defining the locations of its widgets. The following attributes are optionally inserted into the Xi-cam interface layout:
- plugin.centerwidget
- plugin.leftwidget
- plugin.rightwidget
- plugin.bottomwidget
- plugin.toolbar
When not set, default widgets are used. When set to None, the corresponding layout element is not shown.
We first start with a short tutorial in which we some basic plugin functionality, before moving on to the full HipRMC example.
Plugin creation
Our first step is to create the plugin subclass which defines necessary plugin attributes. Again, this file must be created in the directory xicam/plugins to be detected as a plugin:
from xicam.plugins import base

class plugin(base.plugin):
    name = "ViewerRMC"

    def __init__(self, *args, **kwargs):

        super(plugin, self).__init__(*args, **kwargs)
        self.centerwidget = None
        self.rightwidget = None
        self.leftwidget = None
        self.bottomwidget = None
        self.toolbbar = None
The first line imports the plugin base class. The rest of the code names the plugin subclass (“ViewerRMC”) and
instantiates it when Xi-Cam is run. It also sets each widget inherited from the base plugin class to None,
which hides each of these widgets. The plugin at this point literally shows nothing.
Of course, we don’t want to keep it this way. We would like to display images in this plugin, so we add a QTabWidget, from Pyside.QtGui, to hold these
images and set it to the plugin’s centerwidget.
from xicam.plugins import base
from PySide import QtGui

class plugin(base.plugin):
    name = "ViewerRMC"

    def __init__(self, *args, **kwargs):

        self.centerwidget = QtGui.QTabWidget()
        self.centerwidget.setDocumentMode(True)
        self.centerwidget.setTabsClosable(True)
        self.rightwidget = None

        super(plugin, self).__init__(*args, **kwargs)
The first line added overrides the base plugin’s centerwidget by adding a QTabWidget. The second line formats
the widget so that most of its frame is not shown. The final line sets the rightwidget to None. As a result,
this plugin will not show a rightwidget. The third allows tabs to be closed by the user. We must add this
functionality manually with a method that takes and deletes tabs.
from xicam.plugins import base

class plugin(base.plugin):
    name = "ViewerRMC"

    def __init__(self, *args, **kwargs):

        self.centerwidget = QtGui.QTabWidget()
        self.centerwidget.setDocumentMode(True)
        self.centerwidget.setTabsClosable(True)
        self.centerwidget.tabCloseRequested.connect(self.tabClose)
        self.rightwidget = None

        super(plugin, self).__init__(*args, **kwargs)

    def tabClose(self,index):
        self.centerwidget.widget(index).deleteLater()
In the __init__ method, we added a line that connects a tab close request to the method tabClose when the
user requests a tab. tabClose takes and deletes the tab as requested by the user.
Opening and Displaying Images
To display an image, we’ll write a method that takes a path and opens the image. The base plugin class has an
empty openfiles method that will be overriden by your plugin’s own openfiles method.
from xicam.plugins import base
from PySide import QtGui
from pipeline import loader
import pyqtgraph as pg

class plugin(base.plugin):

...

    def openfiles(self, paths):
        self.activate()
        if type(paths) == list:
            self.path = paths[0]
        else:
            self.path = paths

        self.orig_image = np.transpose(loader.loadimage(self.path))

        self.orig_view = pg.ImageView()
        self.orig_view.setContentsMargins(0,0,0,0)
        self.orig_view.setImage(self.orig_image)
        self.centerwidget.addTab(self.orig_view, 'image')
Displaying an image requires pyqtgraph and the loader function from pipeline, a Xi-Cam module. First we
activate the plugin using the activate method inherited from the base class. The image is loaded using the
loader function, but displaying it requires an ImageView object from pyqtgraph. The image is loaded into an
ImageView object, which itself is then loaded into the centerwidget of the plugin.
Adding and Displaying Parameters
In this example we use a ParameterTree from pyqtgraph to display parameters of interest:
from xicam.plugins import base
from PySide import QtGui
from pipeline import loader
import pyqtgraph as pg
from pyqtgraph import parametertree as pt

...
class plugin(base.plugin):
    name = "ViewerRMC"

    def __init__(self):

    ...

         self.scatteringParams = pt.ParameterTree()
         params = [{'name': 'Num tiles', 'type': 'int', 'value': 1, 'default': 1},
                   {'name': 'Loading factor', 'type': 'float', 'value': 0.5, 'default': 0.5},
                   {'name': 'Scale factor', 'type': 'int', 'value': 32, 'default': 32},
                   {'name': 'Numsteps factor', 'type': 'int', 'value': 100, 'default': 100},
                   {'name': 'Model start size', 'type': 'int', 'value': start_size},
                   {'name': 'Save Name', 'type': 'str', 'value': 'processed'}]
         self.configparams = pt.Parameter.create(name='Configuration', type='group', children=params)
         self.scatteringParams.setParameters(self.configparams, showTop=False)
         self.centerwidget.addTab(self.scatteringParams)
The parameters shown here are specific to running HipRMC, but this format can be used equally well on any set of
parameters. This code sets the parameters as a list and loads them into a ParameterTree. To add another parameter
called, say, “time,” we must add the parameter name, type, and starting and default values (both optional) to the
params list:
self.scatteringParams = pt.ParameterTree()
params = [{'name': 'Num tiles', 'type': 'int', 'value': 1, 'default': 1},
          {'name': 'Loading factor', 'type': 'float', 'value': 0.5, 'default': 0.5},
          {'name': 'Scale factor', 'type': 'int', 'value': 32, 'default': 32},
          {'name': 'Numsteps factor', 'type': 'int', 'value': 100, 'default': 100},
          {'name': 'Model start size', 'type': 'int', 'value': start_size},
          {'name': 'Save Name', 'type': 'str', 'value': 'processed'}.
          {'name': 'time', 'type': 'int', 'value': 1, 'default': 1}]
self.configparams = pt.Parameter.create(name='Configuration', type='group', children=params)
self.scatteringParams.setParameters(self.configparams, showTop=False)
self.centerwidget.addTab(self.scatteringParams)
This new line adds a “time” parameter of default value 1 to the parameters list. To access the values, we use a
pyqtgraph method child(). For example, self.configparams.child('time').value() returns 1.
Creating and Wiring a Button
Creating and wiring a button to a method is very straightforward:
from xicam.plugins import base
...
class plugin(base.plugin):
    name = "ViewerRMC"

    def __init__(self):
    ...

        funcButton = QtGui.QPushButton("Run function")
        self.centerwidget.addTab(funcButton)
        funcButton.clicked.connect(self.function)
The first two lines create the button and add it to the plugin. The third connects it to a method called function,
which must be written by the user:
from xicam.plugins import base
...
class plugin(base.plugin):
    name = "ViewerRMC"

    def __init__(self):
    ...

        funcButton = QtGui.QPushButton("Run function")
        self.centerwidget.addTab(funcButton)
        funcButton.clicked.connect(self.function)

    def function(self):
        print "hello"
Now once the button is pressed by the user, the terminal will print “hello.”
ViewerRMC Full Example
For the viewer which will display HipRMC output, we need more functionality. Specifically, HipRMC only works on square images, and accepts as an input a parameter file. We would like to see its output on the GUI as well. This full example uses code written above, but much of it is rearranged.
import os
from PySide import QtGui
from xicam.plugins import base
from xicam import config
import pyqtgraph as pg
from pyqtgraph import parametertree as pt
from fabio import tifimage
from pipeline import loader, hig, msg
import numpy as np
import subprocess
import xicam.RmcView as rmc


class plugin(base.plugin):
    name = "ViewerRMC"

    def __init__(self, *args, **kwargs):

        self.centerwidget = QtGui.QTabWidget()
        self.centerwidget.setDocumentMode(True)
        self.centerwidget.setTabsClosable(True)
        self.centerwidget.tabCloseRequested.connect(self.tabCloseRequested)
        self.rightwidget = None

        super(plugin, self).__init__(*args, **kwargs)

    def openfiles(self, paths):
        self.activate()
        view_widget = inOutViewer(paths = paths)
        self.centerwidget.addTab(view_widget, os.path.basename(paths[0]))
        self.centerwidget.setCurrentWidget(view_widget)
        view_widget.drawCameraLocation(view_widget.orig_view,view_widget.cameraLocation)

    def tabCloseRequested(self,index):
        self.centerwidget.widget(index).deleteLater()
Must of the plugin methods remain the same, with the exception of the openfiles method. Here we create an object
called an inOutViewer which will hold the image, the image after the camera location has been centered, and the
output of HipRMC. The inOutViewer class is defined below. The drawCameraLocation is a method of inOutViewer.
It draws the camera location of the image as a dot.
class inOutViewer(QtGui.QWidget, ):
    def __init__(self, paths, parent=None):

        super(inOutViewer, self).__init__(parent=parent)

        layout = QtGui.QHBoxLayout()
        self.cameraLocation = config.activeExperiment.center
        self.rmc_view= None    #this will hold the output of hiprmc
        self.edited_image = None    #this will hold the centered image
The inOutViewer class inherits from the QWidget class in PySide. layout is the layout of the widget (which we
choose to be horizontal), and the camera location, self.cameraLocation, is accessed through the config
Xi-Cam module. Note that the camera location must be set manually using Xi-Cam’s ``Viewer’’ plugin.
# load and display image
self.orig_view = pg.ImageView(self)
self.orig_view.setContentsMargins(0,0,0,0)
if type(paths) == list:
    self.path = paths[0]
else:
    self.path = paths

self.orig_image = np.transpose(loader.loadimage(self.path))

self.image_holder = QtGui.QStackedWidget()
self.image_holder.setContentsMargins(0,0,0,0)
self.orig_view.setImage(self.orig_image)
self.orig_view.autoRange()

self.image_holder.addWidget(self.orig_view)
This block . The ImageView object itself is loaded into image_holder, a QStackedWidget that allows
windows to be stacked on top of each other. The image_holder will hold the original and edited images, as well as
the HipRMC output, in different tabs.
# configuring the right widget
sideWidgetFormat = QtGui.QVBoxLayout()
sideWidgetFormat.setContentsMargins(0, 0, 0, 0)

 try:
    start_size = max(self.orig_image.shape)
 except ValueError:
    print "Image must be 2-D"

 self.scatteringParams = pt.ParameterTree()
 params = [{'name': 'Num tiles', 'type': 'int', 'value': 1, 'default': 1},
           {'name': 'Loading factor', 'type': 'float', 'value': 0.5, 'default': 0.5},
           {'name': 'Scale factor', 'type': 'int', 'value': 32, 'default': 32},
           {'name': 'Numsteps factor', 'type': 'int', 'value': 100, 'default': 100},
           {'name': 'Model start size', 'type': 'int', 'value': start_size},
           {'name': 'Save Name', 'type': 'str', 'value': 'processed'}]
 self.configparams = pt.Parameter.create(name='Configuration', type='group', children=params)
 self.scatteringParams.setParameters(self.configparams, showTop=False)

 scatteringHolder = QtGui.QStackedWidget()
 scatteringHolder.addWidget(self.scatteringParams)
 scatteringHolder.setFixedHeight(300)
 scatteringHolder.setSizePolicy(QtGui.QSizePolicy.Fixed,QtGui.QSizePolicy.Fixed)

 centerButton = QtGui.QPushButton("Center camera location")
 runButton = QtGui.QPushButton("Run RMC processing")
 sideWidgetFormat.addWidget(scatteringHolder)
 sideWidgetFormat.addSpacing(5)
 sideWidgetFormat.addWidget(centerButton)
 sideWidgetFormat.addSpacing(5)
 sideWidgetFormat.addWidget(runButton)


 centerButton.clicked.connect(self.center)
 runButton.clicked.connect(self.runRMC)

 self.headings = QtGui.QTabBar(self)
 self.headings.addTab('Original Image')
 self.headings.addTab('Recentered Image')
 self.headings.addTab('RMC Timeline')
 self.headings.setShape(QtGui.QTabBar.TriangularSouth)
The __init__ method sets and fills the layout of most of the plugin. In the code block above, we create the right
side of the center widget, which holds the parameters for running HipRMC, as well as buttons for processing our
original image. The parameters are set set and held in a ParameterTree. The bottom two blocks show, respectively,
the connection of buttons to processing methods belonging to the inOutViewer class, and the creation of a
QTabBar that allows users to toggle between the original image, the centered image, and the HipRMC output.
self.drawROI(0,0,self.orig_image.shape[0],self.orig_image.shape[1],
             self.orig_view.getImageItem().getViewBox())

self.edited_view = pg.ImageView(self)
self.image_holder.addWidget(self.edited_view)


sidelayout = QtGui.QVBoxLayout()
sidelayout.addWidget(self.image_holder)
sidelayout.addWidget(self.headings)

layout.addLayout(sidelayout,10)
layout.addLayout(sideWidgetFormat,4)
self.setLayout(layout)

self.headings.currentChanged.connect(self.currentChanged)
self.image_holder.currentChanged.connect(self.headings.setCurrentIndex)
This final few blocks does a few things. It draws an ROI (region of interest) around the image using a method defined
below in case it is hard to see on the background of the viewer. It also creates a place to place the centered image,
which does not exist until the centerButton is pressed by the user. It then lays out the entire center widget.
The final two lines allow the user to change tabs in the image_holder, and call on a short method reproduced
below:
def currentChanged(self,index):
    self.image_holder.setCurrentIndex(index)
The other methods are as follows:
def center(self):

    # if there is already an edited image, discard to make space for a new one
    if self.edited_image is not None:
        self.image_holder.removeWidget(self.edited_view)
        self.edited_view = pg.ImageView(self)
        self.image_holder.addWidget(self.edited_view)

    #resize image so that it's in center
    #displays output on stackwidget

    xdim= self.orig_image.shape[0]
    ydim = self.orig_image.shape[1]

    newx = xdim + 2*abs(self.cameraLocation[0]-xdim/2)
    newy = ydim + 2*abs(self.cameraLocation[1]-ydim/2)
    self.new_dim = max(newx,newy)

    self.edited_image = np.ones((self.new_dim,self.new_dim),dtype = np.int)
    new_center = (self.new_dim/2,self.new_dim/2)

    lowleft_corner_x = new_center[0]-self.cameraLocation[0]
    lowleft_corner_y = new_center[1]-self.cameraLocation[1]

    self.edited_image[lowleft_corner_x:lowleft_corner_x+xdim,lowleft_corner_y: lowleft_corner_y+ydim] \
        = self.orig_image

    # save image
    self.write_path = self.path
    if self.write_path.endswith('.tif'):
        self.write_path = self.write_path[:-4]+'centered.tif'
    else:
        self.write_path += '_centered.tif'
    img = tifimage.tifimage(np.rot90((self.edited_image.astype(float)/
                                      self.edited_image.max()*2**16).astype(np.int16)))
    img.write(self.write_path)

    self.edited_view.setImage(self.edited_image)

    box = self.drawCameraLocation(self.edited_view,new_center)
    self.drawROI(lowleft_corner_x,lowleft_corner_y,xdim,ydim, box)
    self.drawROI(0,0,self.new_dim,self.new_dim,box)

    self.image_holder.setCurrentIndex(1)

def drawCameraLocation(self,imageView_item,location):

    cameraBox = imageView_item.getImageItem().getViewBox()
    cameraPlot = pg.ScatterPlotItem()
    cameraBox.addItem(cameraPlot)
    cameraPlot.setData([location[0]], [location[1]], pen=None,
                            symbol='o' , brush=pg.mkBrush('#FFA500'))

    return cameraBox


def drawROI(self, xpos, ypos, xdim,ydim, view_box):

    roi = pg.RectROI((xpos,ypos),(xdim,ydim),movable = False,removable=True)
    view_box.addItem(roi)
These three methods relate to centering the input image. The first is connected to the centerButton wired in the
creation of the inOutViewer class. It creates a new image so that the camera location of the input image is in the
center of the new image. It also writes the new image in the working directory. The second method draws the camera
location as a dot in the center of the new image. The third method draws an ROI in a specified location. The first
method calls the second once to draw the camera location, and the third method twice to draw ROIs around the old and new
images.
def runRMC(self):
    msg.showMessage('Running RMC for centered version of {}'.format(self.path), timeout=0)

    # if there is already a viewer present, remove it to make room for another
    if self.rmc_view is not None:
        self.image_holder.removeWidget(self.rmc_view)

    if self.edited_image is None:
        msg.showMessage('Error: no image loaded',timeout = 0)
        msg.clearMessage()
        return

    params = self.configparams
    hig_info = {'hipRMCInput': {'instrumentation': {'inputimage': "{}".format(self.write_path),
                                         'imagesize': [self.new_dim, self.new_dim ],
                                         'numtiles': params.child('Num tiles').value(),
                                         'loadingfactors': [params.child('Loading factor').value()]},
                     'computation': {'runname': "{}".format(params.child('Save Name').value()),
                                     'modelstartsize': [params.child('Model start size').value(),
                                                        params.child('Model start size').value()],
                                     'numstepsfactor': params.child('Numsteps factor').value(),
                                     'scalefactor': params.child('Scale factor').value()}}}

    h = hig.hig(**hig_info)
    hig_name = './' + params.child('Save Name').value()
    if not hig_name.endswith('.hig'):
        hig_name += '.hig'

    h.write(hig_name)
    proc = subprocess.Popen(['./hiprmc/bin/hiprmc', hig_name], stdout=subprocess.PIPE, stderr=subprocess.PIPE)
    output, err = proc.communicate()

    msg.showMessage('Done')

    # complicated way of finding and writing into folder name written by hiprmc
    ind = output.index(params.child('Save Name').value())
    rmc_folder = './{}'.format(output[ind:].split("\n")[0])
    os.rename(hig_name, '{}/{}.hig'.format(rmc_folder,params.child('Save Name').value()))

    # write output of RMC to file in hiprmc output folder
    output_path = rmc_folder + "/{}_rmc_output.txt".format(params.child('Save Name').value())
    with open(output_path, 'w') as txt:
        txt.write(output)

    # add rmcView to tabwidget
    self.rmc_view = rmc.rmcView(rmc_folder)
    self.rmc_view.findChild(QtGui.QTabBar).hide()
    self.rmc_view.setContentsMargins(0,0,0,0)
    self.image_holder.addWidget(self.rmc_view)

    self.image_holder.setCurrentIndex(2)
This final method is connected to the runButton in the inOutViewer. It takes the params held in the
inOutViewer and writes them into a hig file, the necessary input for the hiprmc code. The method calls
hiprmc as a subprocess. hiprmc writes a folder of images, so the method writes its feedback as a txt, and
transfer this and the hig file to this folder. Finally, it creates an rmcView class, a Xi-Cam module, to
display the output images.